This documentation was created using the sample application which at the time of this documentation hasn't been
made available for download from our website.
This document is intended to be used as a reference to understand the simplicity of interracting with
the Model 201 using the combination of C# and our M201_SP.DLL
dynamically linked library. The code that is presented here, was developed and tested using Visual Studio 2005 on a WinXP machine.
It should be possible to copy and paste some of the sample code presented here into your own version of a C# compiler. The most recent
M201_SP.DLL can be downloaded from our website
HERE. Full reference
to the usage of M201_SP.DLL can be found
HERE , which may be the path you
orginally used to arrive at this document and can likely return to using your browser BACK button. Prototyping for
the function calls available through the API should be easy to derive at by looking at the
protoyping used by C++.
The information at links provided above, will demonstrate the simplicity of connecting to the
Model 201 using M201_SP.DLL , setting a channel, and reading
a voltage. Prototyping for the entire API in several programming languages is available at the previous link, which combined
with the
simple example,
should provide a developer with all the required information to interract with the Model 201
in any way desirable. Please be sure to read all the information provided at the link above since there are many options regarding
both static and dynamic configuration, as well as various ways to read the voltage data ( memory buffer,
log file, or a
combination of both ) while in scanning mode.
| |
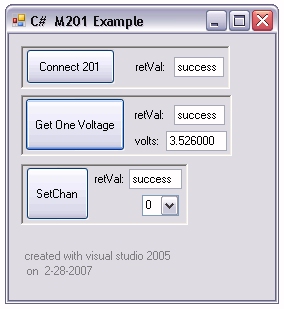
This screenshot shows what was produced by
sample code
that is shown further down this page.
Note that for the minimal sample app shown
here, there was no need for me to add a button to
set the COM port, since the default is COM-1 which
is the one I used. The
default configuration
is explained
within the documentation elsewhere, as well as the
sample code shown further down this page.
| 
|
 // Demonstrates initializing to a  polled mode  state with default configuration.

 // To begin, you must create a new C# project. To do so, open VisualStudio and select:
 //        file -> new -> Visual C# -> Windows -> Windows Application
 // The application wizard, should present you with a new blank form named "Form1"

 // For this example to make sense, you will need to create the followwing.
 //    Four buttons. Name them,  btnConnect201,  btnSetCOM,  btnSetChan,  btnGetConv
 //    Four text boxes. Name them,  txtRetVal,  txtPort,  txtPollChan,  txtVoltage

 // Shown first below, are the modules that I used in my sample application. You may not
 //   need all of them, but it may be best to include them unless you are sure you will
 //   not need them with whatever you decide to extend the code that's shown below.

 using System;
 using System.Data;
 using System.Text;
 using System.Drawing;
 using System.Windows.Forms;
 using System.ComponentModel;
 using System.Collections.Generic;
 using System.Runtime.InteropServices;

 namespace CSharpTest
 {
     public partial class Form1 : Form
     {
         [DllImport("M201_SP.dll")] public static extern byte EX_SetCOMport(byte bPort);
         [DllImport("M201_SP.dll")] public static extern byte EX_InitDev();
         [DllImport("M201_SP.dll")] public static extern byte EX_SetPolledModeChan(byte bMainChan, byte bSubChan);
         [DllImport("M201_SP.dll")] public static extern byte EX_GetOneConversion(double[] dblMilliVolts);

         public Form1() { InitializeComponent(); }

         private void btnSetCOM_Click(object sender, EventArgs e)
         {
             Byte bPort = byte.Parse(txtPort.Text);
             EX_SetCOMport(bPort);
         }
         private void btnConnect201_Click_1(object sender, EventArgs e)
         {
             if(EX_InitDev() == 1) txtRetVal.Text = "success";
             else { txtRetVal.Text = "failed"; }
         }
         private void btnSetChan_Click(object sender, EventArgs e)
         {
             Byte bMainChan, bSubChan = 0;
             bMainChan = byte.Parse(comboChan.Text);
             if(EX_SetPolledModeChan(bMainChan, bSubChan) == 1) txtSetChanReturn.Text = "success";
             else txtSetChanReturn.Text = "failed";
         }
         private void btnGetConv_Click(object sender, EventArgs e)
         {
             double[] dblVolts = new double[1];
             if(EX_GetOneConversion(dblVolts) == 1)
             { txtVoltRetVal.Text = "success"; txtVoltage.Text = string.Format("{0:f6}", dblVolts[0] / 1000); }
             else txtVoltRetVal.Text = "failed";
         }
     }
 }

 NOTES:
 No need to call EX_SetCOMport  if you are connected to COM-1 since that is already
 set as the COM port by the DLL. Also regarding the COM port, it's important to remember
 that the call expects a zero-based port - in other words to set COM-1, use EX_SetCOMport( 0 );

 The same zero-base mentioned above is used for all. So to set the first channel, you would
 use  EX_SetPolledModeChan( 0 );

 The call to   EX_SetPolledModeChan ( . . . )  requires that you pass both a main and sub-channel.
 However, unless a multiplexer is connectd, the sub-channel value is ignored.
.
| |
| COM port ( zero based ) | 0 ( COM 1 ) |
| Serial port transmit buffer size | 16 |
| Serial port receive buffer size | 32000 |
| BAUD rate | 9600 |
| Data Rate | 60Hz. |
| Scan Interval | 0.167 sec. |
| Scan Type | Normal (multi-chan) |
| Channel 0 code | 0x01 |
| Channel 1 code | 0x10 |
| Channel 2 code | 0x10 |
| Channel 3 code | 0x10 |
| Channel 4 code | 0x10 |
| Channel 5 code | 0x10 |
| Number of channels (and sub-channels if any) for multi-channel scanning | 1 |
| Channel used for single-channel scanning | 0 |
| Sub-channel used for single-channel scanning | 0 |
| Remote Average | 1 |
| Polarity | Bi-Polar |
| Filter | 400Hz |
|
Time / s   	0 - 0
00000.0   	1.4847893
00000.1   	1.4847744
00000.2   	1.4847792
00000.3   	1.4847816
00000.3   	1.4847762
00000.4   	1.4847774
00000.5   	1.4847816
00000.6   	1.4847816
00000.7   	1.4847732
00000.8   	1.4847816
00000.9   	1.4847792
00001.0   	1.4847720
00001.0   	1.4847762
00001.1   	1.4847726
00001.2   	1.4847786
00001.3   	1.4847738
00001.4   	1.4847726
00001.5   	1.4847762
00001.6   	1.4847726
00001.7   	1.4847828
00001.7   	1.4847762
00001.8   	1.4847792
00001.9   	1.4847762
00002.0   	1.4847756
00002.1   	1.4847792
00002.2   	1.4847780
00002.3   	1.4847714
00002.4   	1.4847756
00002.4   	1.4847798
00002.5   	1.4847756
00002.6   	1.4847786
00002.7   	1.4847738
00002.8   	1.4847792
00002.9   	1.4847786

Minimal System Interval:	0.08678
Applied Interval:        	0.08704
Subcycles averaged:      	35
Started:                 	Fri Nov 05 14:41:36 2004
Finished:                	Fri Nov 05 14:41:39 2004
Experiment Description:  	none
..
|
Screenshots of CSharp Scanning Example Application |
 | |
 |
|
after loading sample application | |
after getting one scan |
This sample application will retrieve one scan each time the GetScanData button is pressed.
The GetOneScan button can also be pressed once to give it focus and then the keyboard ENTER held
down to read continuously.
Finally, the reading of the scan data can be placed in a thread or timer to read whenever data is ready
by calling EX_GetScanDataDbl once with uiNumScansToReturn set to zero
and then a second time with uiNumScansToReturn set to whatever was returned by previous
call in variable pointed to by puiNumScansInBuff
|